
|
|
|
#21
 01-08-2018, 08:59 AM
|
|||
|
|||
|
I especially like showing your approach to the corner joggles.
Thanks for showing!
__________________
Mike 
|
|
#23
01-13-2018, 09:23 PM
|
||||
|
||||
|
Thanks for the comments!
We were originally going to hinge the console lid along the passenger side, but thought it would be better accessible from either front seat if it was hinged at the rear. We're using the same hinge as we used for the widened glove box door. In our attempt to add a torsion spring to keep the lid upright in the open position, we couldn't find the size to fit our 1/8" diameter hinge pin with enough torsion to hold the lid open. (Yes, even McMaster failed us) So we decided to wrap our own. Here's a fixture we made for the Aloris tool holder on the South Bend to act as a guide for the 1/16" music wire. 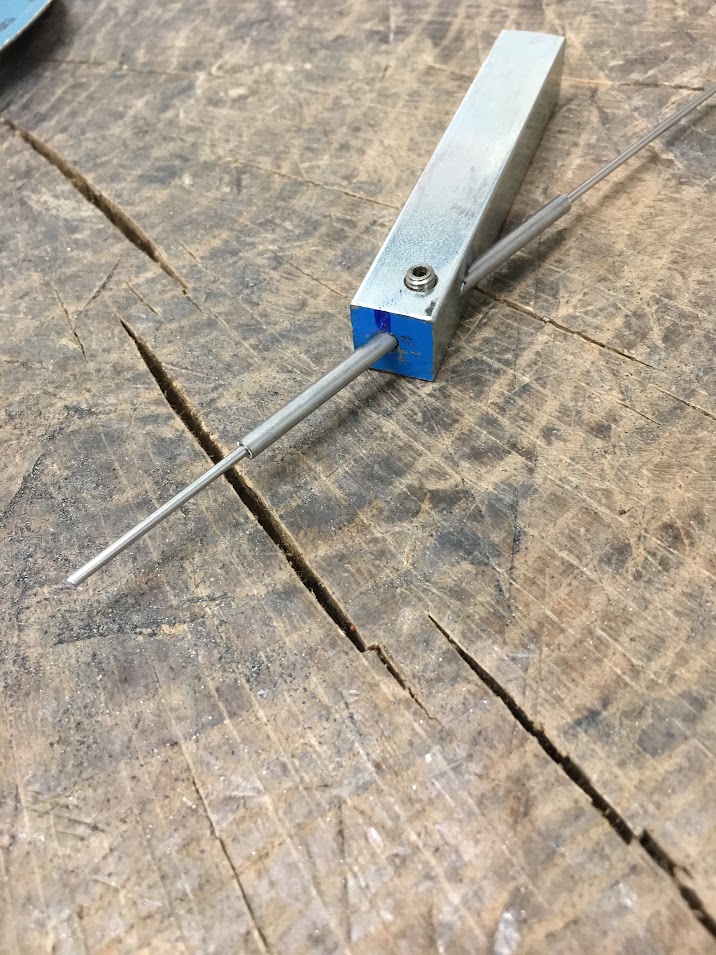 We also installed the older 3 jaw chuck, but not before adding a "wire catch" 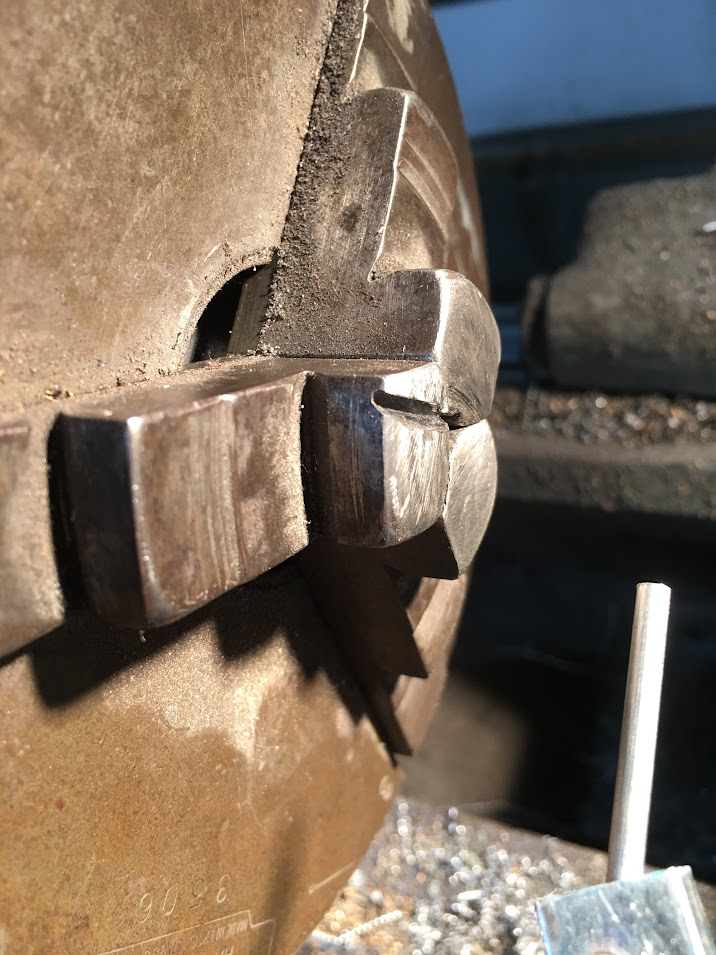 Here's a video of us wrapping the spring... As my South Bend lacks slow enough speed for such a task, we opted for manual rotation.. https://www.youtube.com/watch?v=OvJAIk1-Cs4 Here's the positioning and function of the hinge with torsion spring installed... https://www.youtube.com/watch?v=QPPY2dVOzmQ With our hinge now positioned, we also found we needed to move the hinge closer to the rear edge for better lid clearance while open. Back up and punt you say? 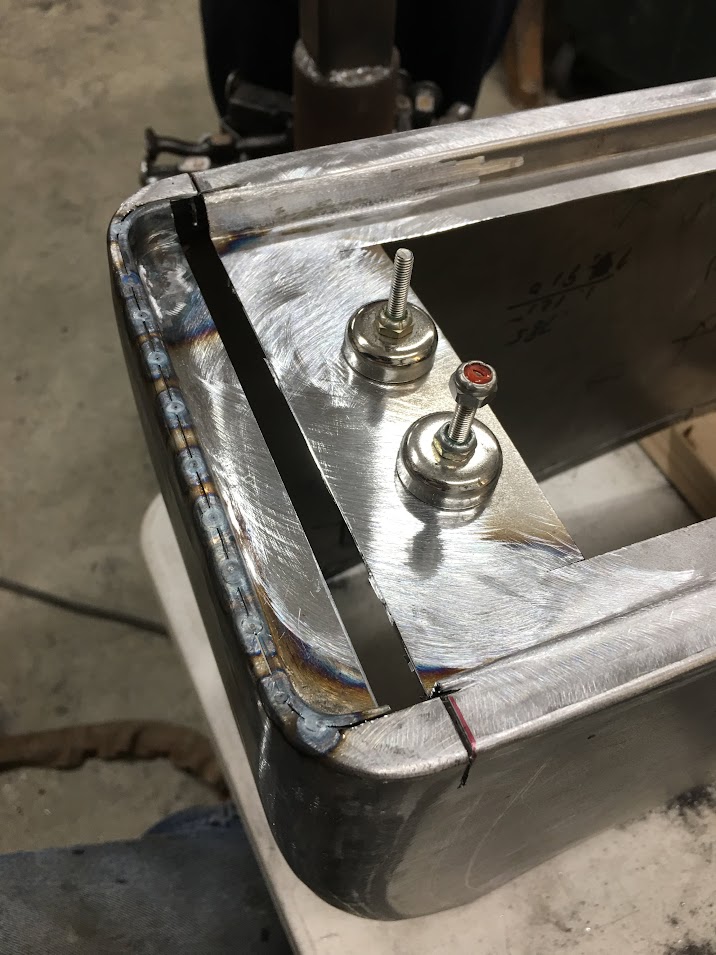
__________________
Robert Instagram @ mccartney_paint_and_custom McCartney Paint and Custom YouTube channel
|
|
#24
01-29-2018, 12:37 AM
|
||||
|
||||
|
Didn't get as many pictures this weekend as I'd have liked. I was welding in the front cross piece that Jake made to the console and had some underside welds to do. Sometimes we make it easier on ourselves, especially if we can't weld upside-down all too well..
 Suspended from the door track...  The hinge at the rear now moved rearward, metal added for mounting the hinge and securing the "storage recess".  
__________________
Robert Instagram @ mccartney_paint_and_custom McCartney Paint and Custom YouTube channel
|
|
#25
02-20-2018, 11:26 PM
|
||||
|
||||
|
OK, here's our update for the past couple weeks..
With console in place and bezel checked to proper height, anchors are set in place for welding to the floor pan. Bolted to shifter plate for proper alignment and standoffs used to provide space to get in there and weld...    And here we're cutting out our console lid... 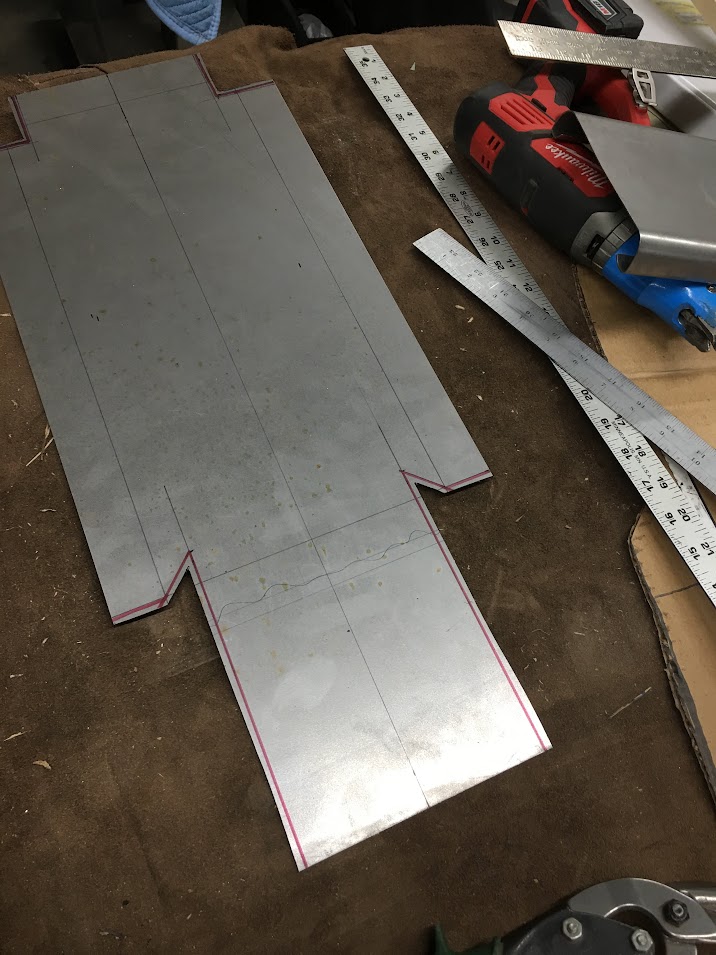 Thinning bend lines for a more crisp bend...  A piece of round rod in our magnetic brake gives us radius-ed corners...  A few passes in the Tommasini Wheeling Machine gives a bit of crown for better support  Corner details TIG welded in...  Corner detail test fit...  There we go, all caught up!
__________________
Robert Instagram @ mccartney_paint_and_custom McCartney Paint and Custom YouTube channel
|
|
#26
02-21-2018, 03:49 AM
|
|||
|
|||
|
Really interesting thread guys,...... No problems,,, Only Solutions !!
Best regards Mick
__________________
Michael Henry Sutton
|
|
#27
02-25-2018, 08:48 PM
|
||||
|
||||
|
Thanks Mick!
More work on the lid... 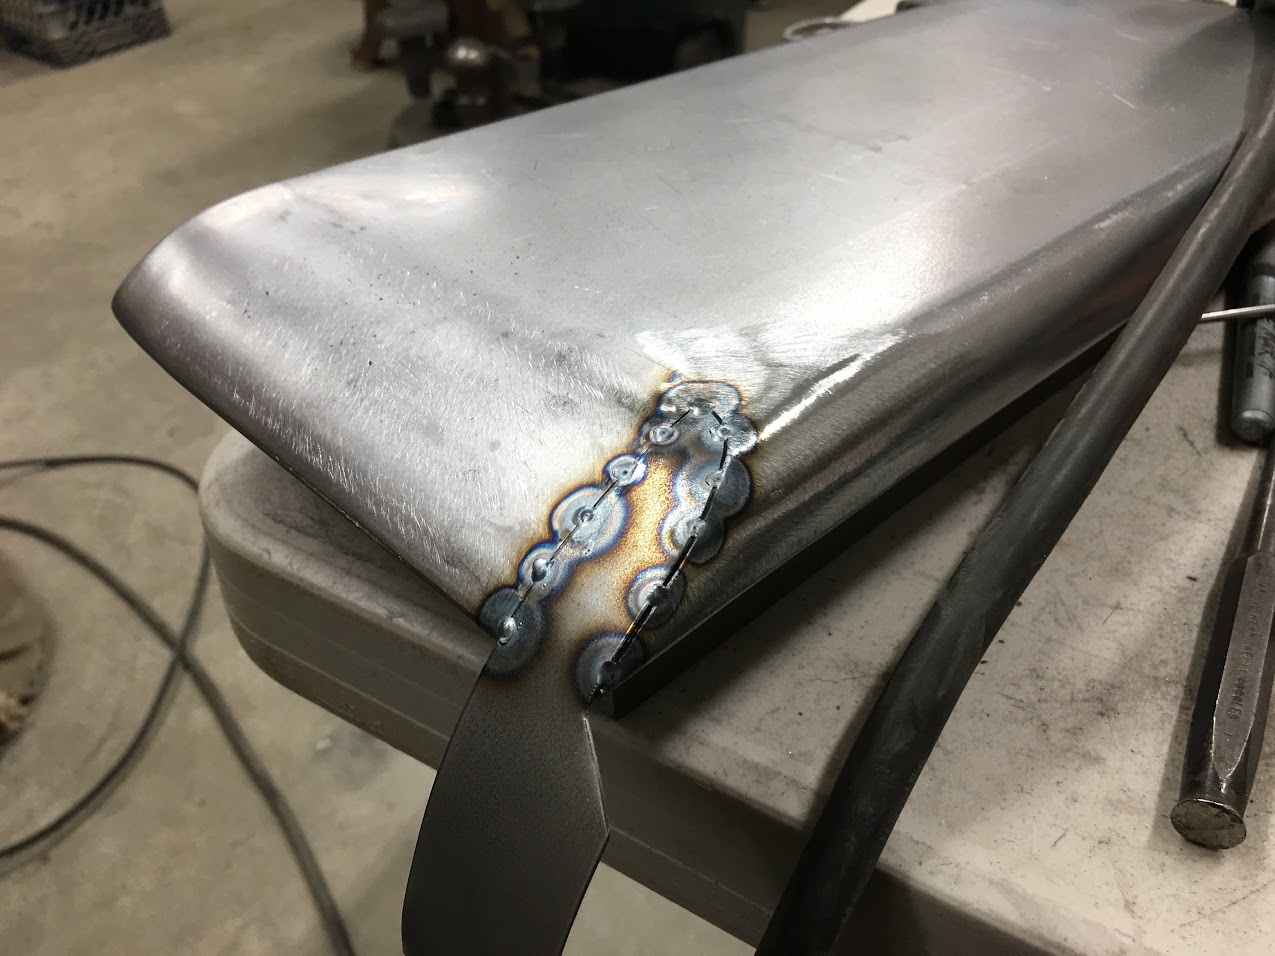 Lid hangs over slightly in the front to serve as our only pull/lift for opening the lid, nice and tidy. It will be held closed using rare earth magnets.  Video version: https://www.youtube.com/watch?v=e3cAFzk8Zfc More details on the console, we had hemmed all the edges to help protect the upholstery when it gets wrapped, but the tunnel cutout at the rear still needed an "added" hem.  Then our hem is tacked in place, edges adjusted with a drum sander, and the two edges fusion welded together using the TIG.   ....and sanded smooth..  Next, layout and folding the insert for the console. Some parts needed to fill in voids will be added later..     Test fit....  Video: https://www.youtube.com/watch?v=J20U5oIL8vw
__________________
Robert Instagram @ mccartney_paint_and_custom McCartney Paint and Custom YouTube channel
|
|
#28
02-26-2018, 07:24 AM
|
|||
|
|||
|
so damn cool. Been watching this one on FB
__________________
Steve
|
|
#29
03-02-2018, 06:56 AM
|
||||
|
||||
|
Thanks for the props Steve!
More progress, making our insert for the console whole...  Clamped up for tacking with the TIG welder...  Video of fusion tacks: https://www.youtube.com/watch?v=BO2a915SAuk   https://www.youtube.com/watch?v=wr69SZk7YXI 
__________________
Robert Instagram @ mccartney_paint_and_custom McCartney Paint and Custom YouTube channel
|
|
#30
10-11-2018, 10:06 PM
|
||||
|
||||
|
Back in the shop we needed to finalize our console lid design as some parts are getting ready to go for upholstery. Our piano hinge showed to have clearance issues when using it in "hidden" mode..
 ....as shown here... https://www.youtube.com/watch?v=puZl_3KBzMg We could notch the rear of the console and lid and move the hinge flush with the rear, but that would leave the hinge visible when closed, and now require and lanyard to keep it from flopping all the way over.. https://www.youtube.com/watch?v=H2AKHWuSlyY We started looking at hidden hinges at one of our local cabinet maker. Although this one looks plenty stout, it was far to wide for our present design, and would require quite a bit of rework.. https://www.youtube.com/watch?v=LBqo7m20H34 With the new options, we narrowed our search to a cabinet hinge that was narrow enough to fit within our side confines, and found this one online.. 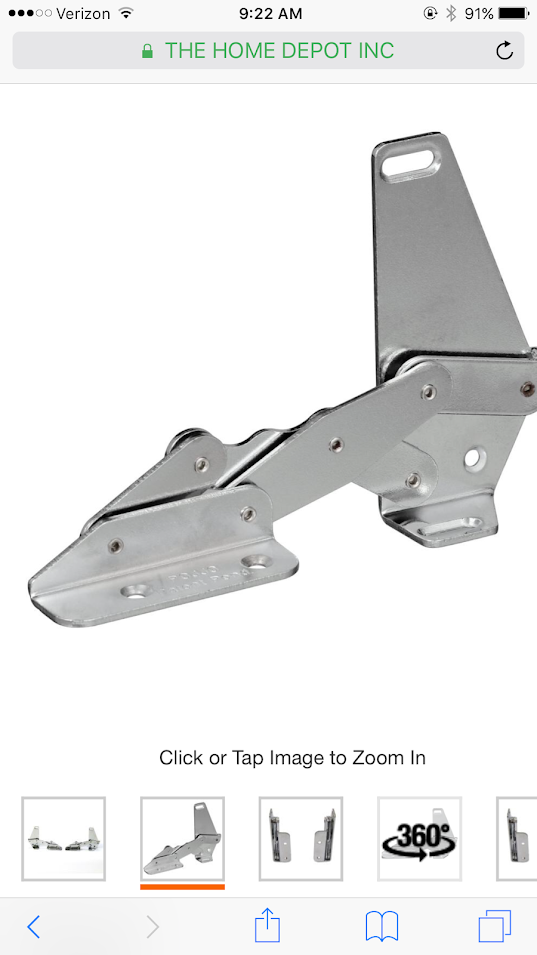 Source: https://www.homedepot.com/p/POJJO-1-...0100/203262152 Test fit, a straightedge is clamped to the hinge, aligned with the rear edge to see what interference this may have. Looks like this is the one.. https://www.youtube.com/watch?v=IV4lPQKqBC8 with the new hinges we got for the console lid being such an afterthought, the room provided in our void openings was going to drag the sides of the angle bracket once upholstery was wrapped inside the slot.  Better to make changes (and weld) before the upholstery goes on. So we made some new rear corners that bump us out slightly more than a 16th and use a slightly larger inside radius for a bit extra strength.     This is much better clearance than we had before, one more corner to go and we can fit up the lid. 
__________________
Robert Instagram @ mccartney_paint_and_custom McCartney Paint and Custom YouTube channel Last edited by MP&C; 09-08-2019 at 11:42 PM.
|
 |
| Thread Tools | Search this Thread |
| Display Modes | |
|
|


 Linear Mode

